Inground Pool Installation: Everything You Need to Know

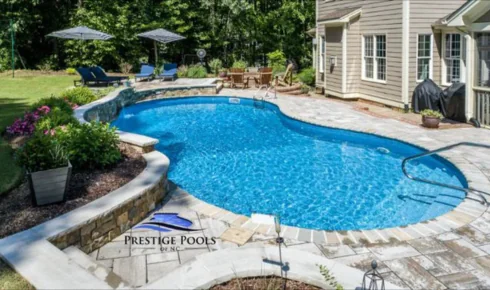
Installing an inground swimming pool is one of the most exciting home improvement projects a homeowner can undertake. Not only does it significantly increase your property’s aesthetic appeal and value, but it also creates a private oasis for relaxation, entertainment, and family fun. However, the installation of an inground pool is a detailed process that involves planning, preparation, construction, and finishing. This article offers a comprehensive, step-by-step guide to the inground pool installation process.
1. Understanding the Benefits of an Inground Pool
Before diving into the technical aspects, it’s helpful to understand why homeowners choose inground pools:
- Long-term durability: Inground pools are built to last for decades with proper maintenance.
- Aesthetic versatility: Pools can be customized with various shapes, finishes, and landscaping options.
- Property value: A well-designed pool increases home resale value and curb appeal.
- Lifestyle enhancement: Perfect for fitness, recreation, and creating memorable family moments.
2. Choosing the Right Type of Inground Pool
There are three primary types of inground pools:
a. Concrete (Gunite or Shotcrete) Pools
- Highly customizable in shape and depth
- Extremely durable but higher in cost
- Can take 2–3 months to install
b. Vinyl Liner Pools
- Lower upfront costs
- Smooth surface and quick installation
- Liner may need replacement every 7–10 years
c. Fiberglass Pools
- Factory-molded and pre-finished
- Fastest installation (often under 3 weeks)
- Limited design flexibility but low maintenance
Each type has its own advantages depending on budget, desired aesthetics, and long-term maintenance considerations.
3. Pre-Installation Planning
Proper planning is key to a successful pool installation. This phase includes:
a. Budgeting
Determine how much you’re willing to invest. Inground pool installation costs can range from$35,000 to $100,000+, depending on the pool type, size, materials, and features.
b. Site Assessment
A contractor will inspect your backyard for:
- Soil condition
- Drainage
- Sun exposure
- Access for excavation equipment
- Elevation or slope of the yard
c. Permits and Regulations
Most municipalities require building permits for inground pools. Other approvals may include:
- Electrical and plumbing inspections
- HOA or zoning compliance
- Safety regulations (such as fencing or alarms)
4. Design and Layout
Your pool contractor will work with you to design a pool that suits your space, budget, and vision. Considerations include:
- Pool shape (rectangle, kidney, freeform)
- Size and depth
- Entry options (stairs, tanning ledge, beach entry)
- Surrounding decking or patio
- Special features like lighting, waterfalls, or attached spas
Once the design is finalized, the contractor will create construction drawings and submit them for permitting.
5. Excavation
After all permits are secured, excavation begins:
- The pool area is marked and staked
- Excavators dig the hole according to the pool’s shape and dimensions
- Excess soil is removed or relocated
- For vinyl or concrete pools, the hole may be slightly oversized to allow for wall framing or rebar
This stage typically takes1–3 days, depending on the size of the pool and soil conditions.
6. Structural Construction
This step varies depending on the pool type:
Concrete Pools
- Rebar is installed to reinforce the structure
- Gunite or shotcrete is sprayed onto the steel frame
- The shell is cured for several days to strengthen
Vinyl Pools
- Steel or polymer panels are assembled to form the pool walls
- The floor is shaped and smoothed with sand or vermiculite
- A vinyl liner is installed after plumbing is complete
Fiberglass Pools
- The pre-formed shell is delivered and placed into the hole using a crane
- It’s leveled and adjusted before backfilling
7. Plumbing and Electrical Installation
Essential components are installed to run the pool efficiently:
- Plumbing linesfor water circulation, drains, skimmers, and returns
- Filtration and pump systemsare set up
- Optional heaters, salt systems, or automation systems
- Electrical wiringfor pumps, lights, and heaters is completed by a licensed electrician
At this stage, many cities require an inspection before covering any underground utilities.
8. Backfilling and Coping
Once the structure is in place and utilities are connected:
- Backfilling is done around the pool shell using sand, gravel, or flowable fill
- Coping, the edge material around the pool (concrete, stone, pavers), is installed to create a finished border
Backfilling must be done carefully to prevent voids or shifting that could affect the pool’s stability.
9. Decking and Hardscaping
Your pool area is not complete without functional and attractive decking:
- Concrete (broom finish, stamped, or decorative)
- Pavers (brick, stone, travertine)
- Wood or composite materials
Decking not only improves aesthetics but also provides a safe, non-slip surface for swimmers and guests. This is also the time to add features like retaining walls, outdoor kitchens, or fire pits.
10. Pool Finish and Water FillingConcrete Pools
- A finish such as plaster, quartz, or pebble is applied
- After curing, the pool is filled with water
Vinyl Pools
- The liner is fitted and vacuumed into place
- Water is added once the liner is secured
Fiberglass Pools
- Since the surface is pre-finished, the pool can be filled immediately after backfilling
Water chemistry is tested and balanced to ensure proper pH, chlorine, alkalinity, and calcium hardness.
11. Safety Features and Inspections
Most areas require safety features such as:
- Fencing at least 4 feet high
- Self-latching and self-closing gates
- Pool alarms or safety covers
A final inspection is performed by the local building department to ensure all safety regulations and codes are met.
12. Final Walkthrough and Orientation
Before handing over the pool, the contractor will:
- Walk you through how to operate the pump, filter, and heater
- Explain how to test and balance water
- Demonstrate routine maintenance tasks
- Provide manuals and warranty information
13. Ongoing Maintenance
To keep your inground pool in top condition:
- Skim debris and vacuum the pool weekly
- Check and balance chemical levels
- Clean filters and check water circulation
- Winterize the pool if you live in a cold climate
Many homeowners opt for a pool service company to handle weekly or seasonal maintenance.
Conclusion
Installing an inground pool is a significant investment, but one that pays off in enjoyment, aesthetics, and increased home value. By understanding each step of the installation process—from planning and permitting to construction and maintenance—you can make informed decisions that ensure a smooth, successful project. Working with a reputablepool contractor Indianapolisand investing in quality materials will help you create a backyard paradise that your family will enjoy for decades.


